

Replacing clock hands may seem daunting, but with a few simple steps and the right tools, you can easily restore your clock to its original working order. Whether your clock hands are damaged, bent, or just outdated, this guide will walk you through the process step by step.
Tools You Will Need
- New clock hands (ensure they are compatible with your clock movement)
- Small screwdriver or pliers
- Soft cloth or gloves (to avoid fingerprints and scratches)
- A pair of tweezers (optional for precision)
Step 1: Remove the Old Clock Hands
- Stop the Clock: Make sure your clock is turned off or remove the batteries if it’s a quartz clock to prevent accidental movement.
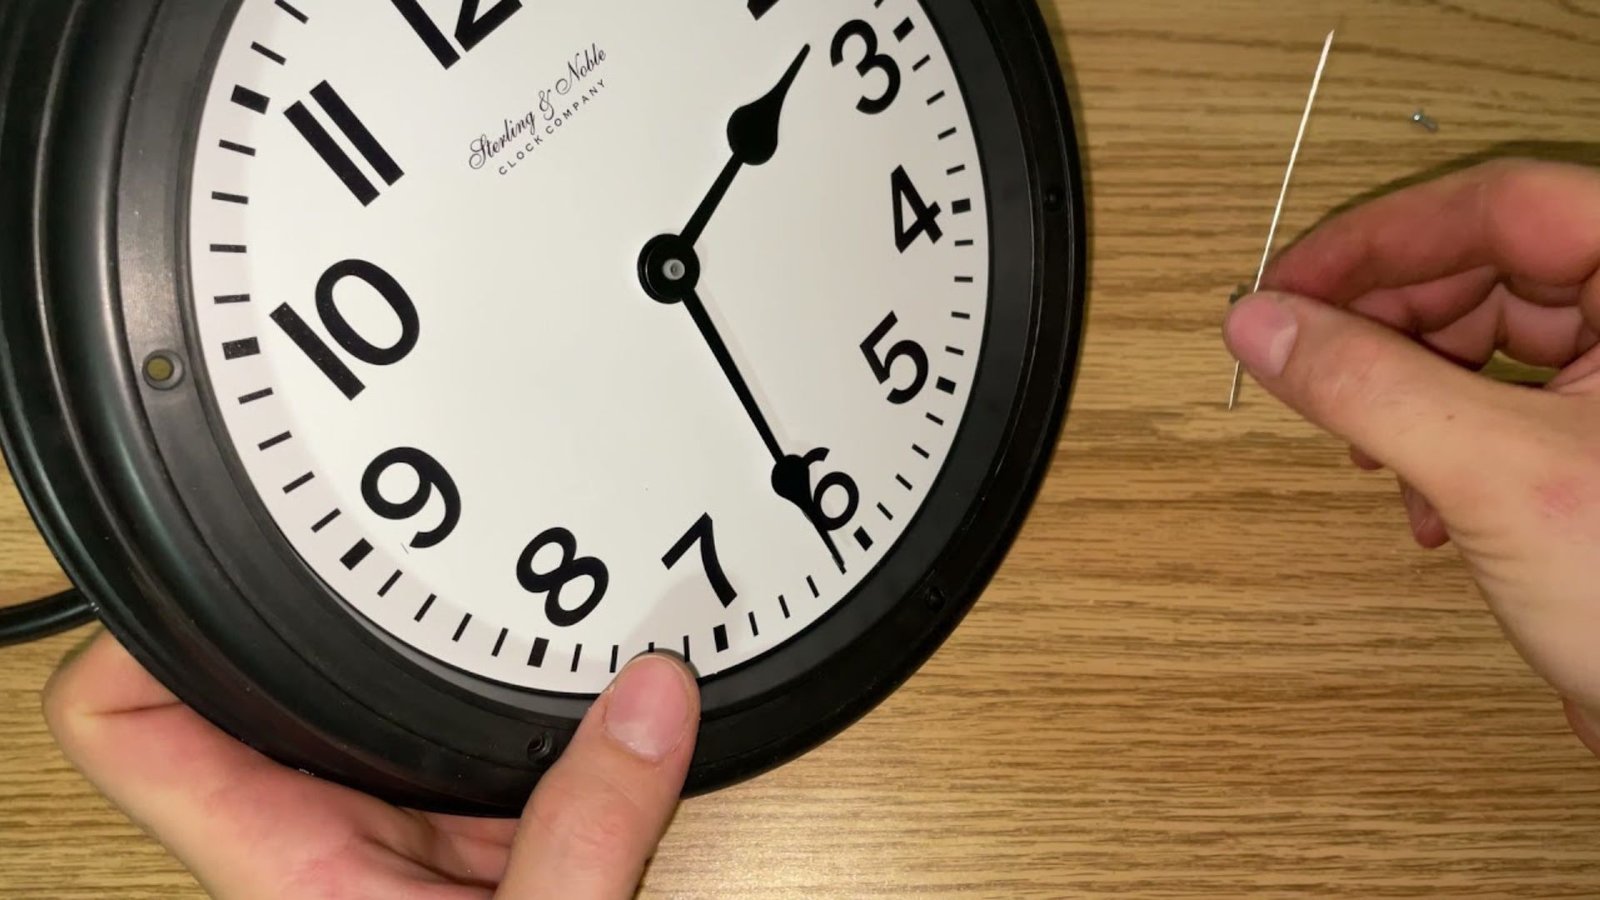
- Gently Pull Off the Second Hand: If your clock has a second hand, this will need to be removed first. Use a pair of tweezers or gently grip the base of the second hand and pull it straight off the clock face.
- Remove the Minute Hand: Next, hold the base of the minute hand firmly and gently pull it off. If it’s held in place by a small nut, use a screwdriver or pliers to remove the nut before pulling the hand off.
- Remove the Hour Hand: Finally, grip the hour hand close to the center and carefully pull it upwards, away from the clock face.
Step 2: Prepare the New Hands
Before attaching the new clock hands, ensure they are compatible with your clock’s movement. Clock hands come in various sizes, so double-check that your replacement set will fit. If necessary, slightly bend the new hands to avoid interference with each other, but be careful not to damage them.
Step 3: Install the Hour Hand
- Position the Hour Hand: Align the new hour hand over the clock’s shaft and press it down firmly but gently. Ensure it is securely in place but not too tight to prevent movement.
- Check Alignment: Ensure the hour hand points to exactly one of the hour marks, such as 12 o’clock, to maintain accurate time when you reassemble the clock.
Step 4: Install the Minute Hand
- Place the Minute Hand: Once the hour hand is in place, align the new minute hand over the shaft. Gently press it down until it is securely attached.
- Secure with Nut (if applicable): If your clock uses a nut to hold the minute hand in place, screw the nut on carefully, ensuring it’s tight enough to hold the hands but not overly tightened, as that can damage the mechanism.
Step 5: Attach the Second Hand (if applicable)
If your clock has a second hand, carefully push the new second hand onto the center shaft. Ensure it moves freely and doesn’t touch the minute or hour hands.
Step 6: Test the Clock
Once all the hands are in place, reinstall the batteries or wind your clock, and observe the movement. Make sure the hands move freely without touching each other or sticking. Adjust the hands if necessary to ensure smooth operation.
Step 7: Final Adjustments
If the hands are brushing against each other or the clock face, gently bend them slightly apart. Ensure that all hands move smoothly and accurately, without interference.
Conclusion
Replacing clock hands is a simple task that can revive an old or malfunctioning clock. By following these steps and using the right tools, you can easily install new clock hands and enjoy a fully functioning timepiece. Regular maintenance, such as cleaning and occasional hand replacement, will keep your clock looking and working great for years.


Just stumbled upon 711ph. Seems like a decent place to kill some time and maybe win a few pesos. Fingers crossed! Let me know if you’ve tried it before. More info here 711ph.
In a world driven by technology and precision, should we view historical clocks as mere timekeepers or as sacred artifacts deserving reverence? What lessons can we learn from the craftsmanship and artistry of these timepieces that transcend their functional purpose?
Been watching the sabong action on dagavietlivesv388.com lately! The stream quality is top-notch, and it’s really easy to place bets. If you’re into live cockfights, this is your go-to! You can watch here dagavietlivesv388
Um diesen zu erhalten, müssen Spieler sich nach der ersten Einzahlung auf ihr Spielerkonto
an den Kundendienst wenden, und zwar noch bevor sie erstmals im
Casino spielen. Während der klassische Neukundenbonus im Casino alten Formats zum allgemeinen Standard gehört, beschreiten Kryptocasinos oftmals einen anderen Weg.
Shuffle.com ist ein neues und innovatives Online-Casino & Sportwetten, das die beste Auswahl an Casinospielen und Sportereignissen bietet
und seit seinem Start im Februar 2023 sein Angebot und seine Sportarten stetig erweitert und
optimiert. Neben dem 100% Bonus auf deine erste Einzahlung und den 200 Freispielen, bietet unser Paket weitere Vorteile bei deinen nächsten Einzahlungen. Teilnahme an Glücksspiel ab 18 Jahren – Glücksspiel kann süchtig machen –
Hilfe finden Sie auf spielsuchthilfe.at oder anonyme-spieler.at
Unser VIP-Programm bietet unseren engagiertesten Spielern ein Premium-Erlebnis
mit exklusiven Vorteilen, schnelleren Belohnungen und persönlichem Support.
Shuffle veröffentlicht seine Logik für nachweisliche Fairness und bietet ein Tool, mit dem Sie die
Fairness jedes Spiels überprüfen können. Unser Live-Casino
bietet ein immersives Erlebnis mit echten Dealern, HD-Streaming
und spannender Tisch-Action.
Daher bieten wir schnelle und sichere Zahlungsoptionen an. Diese Partnerschaften ermöglichen es uns, dir eine vielfältige und ständig wachsende Spielauswahl zu bieten. Von Zeit zu Zeit bieten wir auch einen No
Deposit Bonus an, der es dir ermöglicht, unser Casino ohne
eigenes Risiko auszuprobieren. Zudem steht unser Kundensupport rund um die Uhr bereit,
um dir bei Fragen oder Anliegen zu helfen.
References:
https://online-spielhallen.de/ihr-einstieg-ins-gluck-der-casino-of-gold-login/
Auszahlungen meist in unter 24h – ja, wirklich!
Einzahlungen in Sekunden (z. B. per Kreditkarte, Trustly,
eZeeWallet, Jeton, CoinsPaid) Freispiele für Stammkunden Du hast
also trotzdem Seriosität, Datenschutz und schnelle
Auszahlungen – aber eben ohne die deutsche Bürokratie.
Freispiele für bekannte Slots wie Book
of Dead, Sugar Rush oder Big Bass Bonanza Du willst sofort loslegen, ohne Risiko – Freispiele
kassieren oder Startguthaben sichern, ohne vorher Geld zu überweisen.
Viele Angebot im Livecasino sind rund um die Uhr verfügbar.
Diese beiden Unternehmen gelten als Marktführer im Bereich der Livedealer Casinospiele.
Aber auch bekannte Gesellschaftsspiele wie Monopoly
wurden als Grundlage für die Entwicklung von Spielen genutzt.
Darüber hinaus gibt es viele weitere Würfelspiele wie zum
Beispiel Crabs. Online Casinos mit PayPal bieten in der Livedealer Abteilung typischerweise alle klassischen Bankhalterspiele wie Roulette, Blackjack und Baccarat
an.
Für ein nahtloses und problemloses Einzahlen bietet es sich an, Ihre E-Wallet
mit Ihrem Bankkonto zu verknüpfen. So werden Einzahlungen teurer und Ihre Auszahlungen und somit Gewinne geschmälert.
So können Sie schnell einschätzen, ob PayPal als online agierender Zahlungsdienstleister für Sie geeignet ist.
Diese Technologie verhindert, dass Datenlecks in PayPal online auftreten und von Dritten ausgenutzt werden können. Die zweite Verschlüsselungstechnik kommt bei dem Zahlungsanbieter
intern zum Einsatz.
References:
https://online-spielhallen.de/amunra-casino-erfahrungen-der-ultimative-testbericht/
Open the deposit section, choose a payment method and opt-in for a
bonus. Depending on the casino you choose, you will either get an SMS text or an email that you
will need to verify before depositing. I have been playing poker on casino floors for over 20 years, and in that time, I have played over 500 different pokies.
This really is just a way to have a bit more fun at the tables and to make your
playing cash last longer. The only way a progression really works in the long run is if you dedicate a low starting stake
and then stop playing after an X number of losses in a row (that you are comfortable
with).
Playtech offers a mixed array of games, including well known pokies.
It offers a bonus on subsequent deposits, usually as a percentage match,
encouraging you to keep adding funds to your account.
The reload bonus is for existing players to keep them happy and active.
The games should also be of high quality and from top game
developers like Yggdrasil, Microgaming and BetSoft.
References:
https://blackcoin.co/casino-rsm-club-in-depth-review/
Only one no deposit bonus is allowed per person, household, IP address, or device.\
In some cases, existing players may receive no deposit-style offers through special
promotions, loyalty rewards, or email campaigns,
but these are less common. This means you\\u2019ll need to keep playing eligible games
until the required playthrough is completed.\
In addition, casinos usually apply limits such as a maximum bet per spin, restricted games that count toward wagering, and a capped cashout amount.
Most no deposit bonuses come with higher wagering than deposit bonuses, often ranging from 40x to 60x the bonus amount
or the winnings from free spins. Reputable casinos follow strict rules to protect players and ensure fair play, so you can enjoy your free spins or bonus cash with confidence.
As soon as you start playing, you’ll earn club points that unlock higher loyalty levels.
The format is simple — play selected pokies and rack up
points for every win. Competitive gaming at The Clubhouse gets an extra boost with regular tournaments.
Dive into crypto-exclusive games like Bitstarz Millionaire.
Bitcoin, Ethereum, Litecoin, and other cryptocurrencies are fully integrated into the gaming experience.
References:
https://blackcoin.co/baccarat-guide-how-to-play-win-at-baccarat/
Windows Media Player will then check for any available updates and prompt you to download
and install them. This will delete all cached files and may fix the error.
If so, add an exception for MusicMatch-ssl.xboxlive.com in your firewall or antivirus
settings. Firstly, check your internet connection and ensure it is stable.
This error can be frustrating for users who enjoy streaming music from Xbox Live, but fortunately,
there are several ways to fix it.
If the error persists, try the other fixes listed below.
This can help fix any corrupt or outdated files that
may be causing the issue. One possible solution to the MusicMatch-ssl.xboxlive.com error in Windows Media Player is
to clear the cache. By following these steps, you can fix the MusicMatch-ssl.xboxlive.com error and
continue using Windows Media Player smoothly.
Windows Media Player updates can help to resolve any issues
with the program, including the MusicMatch-ssl.xboxlive.com error.
To fix the MusicMatch-ssl.xboxlive.com error in Windows Media Player, you
may need to update the application. If the error persists, try the
other solutions listed in this article.
References:
https://blackcoin.co/betzillo-best-australian-casino-site/
Explore our list to find the ideal online casino that not only meets but exceeds your gaming requirements.
These games blend convenience with the thrill of land-based casinos—no need to leave
your couch! Real money online pokies in Australia with no deposit can be found
at Red Dog Casino, Ignition Casino, Joe Fortune, Las Atlantis, and Ricky Casino.
These games offer engaging themes, stunning visuals, and a variety of features that cater to different preferences and playstyles.
Free spins on popular online pokies are also commonly included in these promotions, providing added value for players.
Welcome to Online.Casino Australia, your number one guide to playing online casino with real money in Australia.
Worried that online casinos will be entirely digital
in terms of gameplay? It offers a $3,000 welcome bonus, which is fairly standard amongst
online casinos. There are hundreds of online casinos, but only a select handful of gambling sites are truly designed with you, the punter,
in mind.
References:
https://blackcoin.co/welcome-to-phcasino-your-premier-destination-for-exciting-gaming-adventures-and-fantastic-cash-prizes/
us poker sites that accept paypal
References:
http://www.govconnectjobs.com
online casino paypal
References:
robbarnettmedia.com
online roulette paypal
References:
http://carecall.co.kr/bbs/board.php?bo_table=free&wr_id=2092656
paypal casinos
References:
https://aba.work/employer/56687/paypal-casinos-2025-best-online-casinos-accepting-paypal
paypal casino android
References:
https://www.grammars.org/bbs/board.php?bo_table=free&wr_id=386
online casino with paypal
References:
https://www.refermee.com/companies/time2plays-guide-to-casino-real-money-games-in-2025/
Just popped over to 444winbet.info. It’s alright! Not gonna lie, some of the odds could be better, but they have a good range of options. Worth comparing with others. See for yourselves: 444winbet
**mitolyn**
Mitolyn is a carefully developed, plant-based formula created to help support metabolic efficiency and encourage healthy, lasting weight management.
66B Các slot game này không chỉ mang lại niềm vui mà còn cơ hội trúng những giải thưởng lớn với các vòng quay miễn phí và tính năng bonus độc đáo. TONY04-08
Backbiome is an advanced daily wellness supplement formulated to help support spinal comfort, reduce feelings of built-up tension, and promote freer, smoother movement throughout backbiome everyday life.
Boostaro is a modern men’s wellness boostaro formula created to support daily vitality, stamina, and confidence through a practical, natural routine.